• Home
    • About
    • Contact
    • Subscribe and Freebie!
  • Lifestyle
    • Momlife
    • Kid’s Activities
    • Gift Giving
    • Pets
    • Home Design & DIY
    • Travel
  • Recipes
    • Breakfast
    • Beverage
    • Main Dish
    • Dessert
    • Side Dishes
    • More Recipes
  • Fashion
  • Shop My Favorites
    • Shop My Favorites
    • Amazon Shop Homepage
    • LiketoKnowIt
  • Bare Strength LA
  • Media Kit
  • Nav Social Icons

  • Skip to primary navigation
  • Skip to main content
  • Skip to primary sidebar
  • Skip to footer
  • Home
    • About
    • Contact
    • Subscribe and Freebie!
  • Lifestyle
    • Momlife
    • Kid’s Activities
    • Gift Giving
    • Pets
    • Home Design & DIY
    • Travel
  • Recipes
    • Breakfast
    • Beverage
    • Main Dish
    • Dessert
    • Side Dishes
    • More Recipes
  • Fashion
  • Shop My Favorites
    • Shop My Favorites
    • Amazon Shop Homepage
    • LiketoKnowIt
  • Bare Strength LA
  • Media Kit
The Southerly Magnolia Blog Logo

The Southerly Magnolia

  • Home
  • Blog
  • Category Index
  • About
  • Contact
  • Media Kit
  • Bare Strength LA

How to Make Your Own Burlap Wreath

November 8, 2017 · In: Home Design & DIY

There is just something about having ‘that’ wreath on your front door. I know you know what I am talking about. You drive by a house with a wreath that looks fabulous. It actually makes the house look fabulous…similar to how certain outfits make you look and feel stunning.

I get wreath envy, particularly during the holidays. I have already started drooling at the mere thought of a Christmas wreath…had to pull in the reigns the other day at Michaels. I love to torture myself for the days leading up to Thanksgiving when I will finally allow myself to put up all the Christmas decor ?

Already done wreaths don’t come cheap either. A plain wreath can cost you at least $30. Yea, you can use one of those 40% off coupons at Hobby Lobby or Michaels. Extra wreath accessories will still need to be purchased to get that wreath to it’s fabulous state…cha-ching $$$.

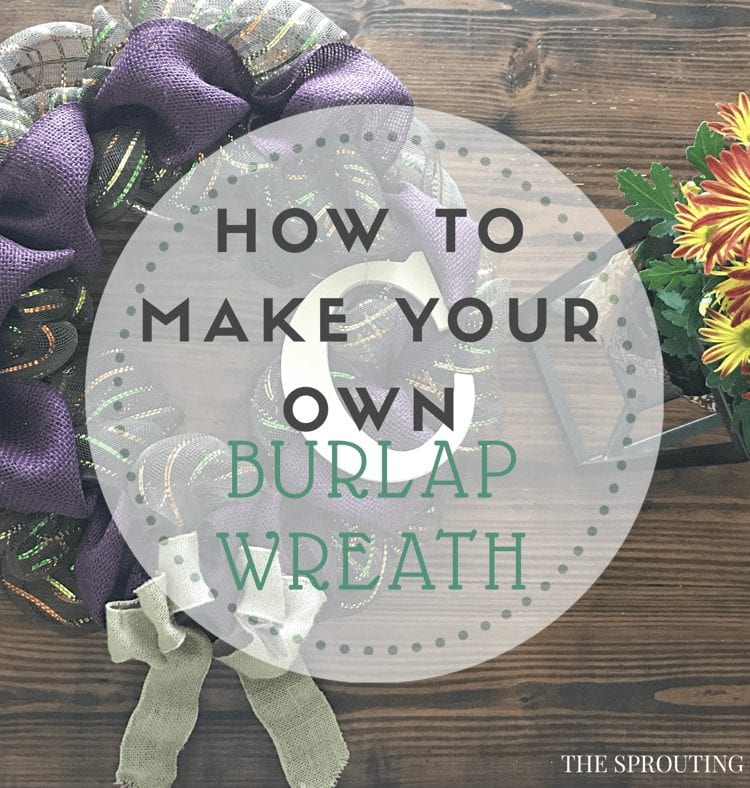
I decided it was about time to take over the whole wreath making for my fall wreath. I got everything I needed for my wreath for under $15. Say what?! You heard me correctly, $15. I purchased a 18” wire wreath for under $3. The burlap bow ($2), wooden Letter ‘C’ ($2), and 2 rolls of different colored burlap ($3 & $4) were all I needed to make a simple and beautiful fall wreath.

I could have added a few cute little fall accessories, like faux mini pumpkins or a spray of fall colored leaves/flowers. I chose to keep this one simple and go all out for my Christmas wreath. The list of things for that wreath is already completed ?

I did not use any glue for this wreath, only using the tucking method. A hot glue can be used in addition to the tucking method. The entire wreath was assembled in 1 hour, perfectly timed during my youngest one’s nap. She would want to help momma out if she were to have been awake, although the help would not have been very helpful.

Wreath Making…

1.) The first step is to pick a spot to start on the wreath. It doesn’t matter where you pick. Once you have this spot picked, tie a knot with the wider burlap around one of the inner wires. This will secure it in place while you work around the wreath.

2.) Slowly weave and tuck the burlap in between the wires of the wreath, making your way around the entire wreath. You don’t want this to be done ‘tightly’. Keep the burlap somewhat fluffy and loose in between tucks.

3.) Cut and tuck the very end of the wider burlap into the wiring once you make it all the way around the wreath. Now to start on the smaller width burlap.

4.) Cut the burlap string keeping the roll secure and set aside for later. Tie a knot with this burlap, similar to the very first step. Once it is secure, you will begin to tuck.

5.) The tucking of the second burlap is much different than the first; instead of wrapping around/tucking in all the wires of the wreath, you will only tuck in the very center wires. This will give the wreath more depth.

6.) As with the wider burlap, cut and tuck once you make it all the way around with the smaller width burlap

7.) Now to add the bow. I wanted to add more character, so added a piece of the left over smaller width burlap to the middle tie of the bow before attaching it to the wreath.

8.) This bow came with a wire tie; easily attached the burlap bow to the wreath by wrapping wire tie around one of the wire rods in wreath

9.) Once the bow is attached, you can add whatever accessories you would like. I chose to go with just the wooden Letter ‘C’ for our last name, Cook. To do this, I used the burlap tie reserved earlier from the roll of burlap. I carefully tied the string around a wire and the ‘C’. Hot glueing it on could be a choice for those who feel better just glueing it all on.

Voila! You have a beautiful wreath not only for under $15, but one you made yourself. Now to just hang it! You can get over the door hangers for $2 or less at Walmart or Hobby Lobby. Don’t you just love easy DIY projects that you can actually do yourself?

Happy Fall y’all! ❤️

By: Clair · In: Home Design & DIY · Tagged: Burlap, diy, fall, Home decor, motherhood, Wreath

you’ll also love

Kids with planter boxHow to Build a Planter Box
Home Decor and Nordstrom Anniversary SaleHome Decor and Nordstrom Anniversary Sale
DIY Cardboard Box Buildings (2)DIY Cardboard Box Buildings

Reader Interactions

Comments

  1. mycouponcodes says

    November 26, 2017 at 10:50 pm

    you’ve gotten a terrific weblog right here! would you prefer to make some invite posts on my blog?

Next Post >

Easy Dollar Tree Pumpkin Decorating

Primary Sidebar

Meet Clair

Meet Clair
hello!

Welcome to The Southerly Magnolia, where I share all things that make up my southern motherhood: recipes, mom style, kids' activities, DIY projects, and some insights into my motherhood. Glad to have you along for the ride!

Read more

Connect

Featured Posts

Simple Spring Porch Upgrade

Sometimes it only takes a few things for an upgrade, including a WaterHog Doormat. Spring is officially here, and I’m getting that front porch ready with a simple spring porch…

Read More

Shrimp Coconut Rice

A weekday recipe that brings the flavor with convenience. This Shrimp Coconut Rice has a Thai-twist, making it perfect to be paired with Minute Instant Basmati Rice! Shrimp Coconut Rice,…

Read More

Easy Jasmine Jambalaya

Laisse les bons moments rouler with this Easy Jasmine Jambalaya, made possible with Minute Instant Jasmine Rice. An easy jambalaya ready on the table in less than 40 minutes! I…

Read More

Categories

  • Lifestyle
  • Momlife
  • Recipes
  • Kid’s Activities
  • Dessert
  • Bare Strength LA

Archives

Follow Along

@thesoutherlymagnolia
Clair Cook

thesoutherlymagnolia

Southern mom bringing y’all style inspo on a budget, easy & family friendly recipes, favorites, and most of all-what the Lord places on my heart! ✨🫶🏻

Beef Tallow.. that’s all 👌🏼 Seriously thou Beef Tallow.. that’s all 👌🏼 Seriously though, @kettleandfire ‘s Grass Fed and Grass Finished Beef Tallow is the perfect replacement when you are cooking at a high temp and are about to grab that butter or other oils. High quality and taste brought right to your kitchen. Paired this beef tallow with some roasted veggies as well as searing off a steak.
 
Roasted Veggies w/ Beef Tallow:

4-6 Fingerling potatoes , cut in half
2 bunches of carrots, peeled and cut into big pieces
1 container of brussel sprouts, cut in half 
2 tablespoons Kettle and Fire Beef Tallow
1 tablespoon minced garlic
3/4 of the Kettle & Fire Beef Broth
Thyme
Salt & Pepper to taste 

 In a large pan, melt the beef tallow at medium - high heat; add the veggies and stir; cook for about 5 minutes and add the garlic, salt and pepper; stir and cook for an additional 2-3 minutes, until garlic is light brown; add beef broth and bring to a boil; once at a boil, cover and allow to simmer for an additional 5-8 minutes - until veggies are tender!

Check out Kettle & Fire and use the code CLAIR20 to get 20% off your order!

#beeftallow #roastedveggies #beeftallowcooking
#fableticspartner You know that outfit that you al #fableticspartner You know that outfit that you always get compliments on? @fabletics did it with this skort! Not only is it comfortable, but so cute! The fit is just right too. Pairing it with this sports bra and bomber jacket to complete the look 👌🏼 

Head over to Fabletics and check these pieces out as well as all the perks you will get as a VIP member!
St. Patrick’s Day fun snack idea🍀💚 Check o St. Patrick’s Day fun snack idea🍀💚 Check out this easy clover St. Patrick’s Day snack! 

All you need:

Pretzels (3 per snack)
Pretzel Stick (1 per snack)
Rolos (1 per snack)
Green M&M’s (1 per snack)

Preheat oven to 350. Assemble your clovers, then place one Rolo where all 4 pretzel pieces touch. Bake for 3-5 minutes, enough time to soften Rolo. Remove from heat and press 1 M&M in the center of the Rolo, making sure all pretzel pieces are still touching and Rolo is helping them stick together. Allow to cool for 10 minutes, enough time for the chocolate to harden! 

💚 https://liketk.it/4yW53

#stpatricks #stpatricksdaytreats #stpatricksdayfood #pretzelsticks #snackideas louisianablogger shopltk
Hanging up her practice and game uniforms for the Hanging up her practice and game uniforms for the last time this basketball season 🥹 What an amazing @sja.basketball season! ❤️🤍❤️🤍
It does seem like fun and games but…it truly is It does seem like fun and games but…it truly is a job. A lot of behind the scene things that people don’t see or understand. Don’t ever judge a book my it’s cover, no matter how fun and easy it may look 😘🫶🏻 

A little breakfast pic from our @jwhoustondwtn when we were in Houston for NCA… so good!! 

#socialmediainfluencer #behindthescenes #batonrougeblogger #louisianablogger
FINAL FOUR DAY! Ready for these girls to show Loui FINAL FOUR DAY! Ready for these girls to show Louisiana what they have been working for 🏀🔥 Let’s go REDSTICKERS! 

❤️🤍❤️🤍❤️

#finalfour #girlsbasketball #lhsaaplayoffs #louisianabasketball #sjastickers
#ad Tired of trying to find simple and realistic w #ad Tired of trying to find simple and realistic ways to incorporate a healthy lifestyle? Whether you are on-the-go or looking for ways to incorporate simple, realistic and healthy products, these following products are a must!

@sunchaserapples are your go-to snack for when you are on the go or just looking for a way to keep fueled for whatever is next! SUNCHASER apples are crisp, naturally sweet, juicy and fiber rich 🍎 Only available at Walmart!

@maizlyforall is a high-fiber, fully functional plant milk powered by non-GMO corn fiber.. smooth, creamy and perfect for those overnight oats or iced coffee/matcha! Maizly is an excellent source of fiber, 8g/cup as well as Vitamin D, A & E. Use the code: MAIZLYFUEL on maizly.com or Amazon to get 20% off, VALID UNTIL 3/31

@trysecondkind Calmer gut, less bloat? Enter in SECONDKIND Gut Balance Postbiotic and Mood Balance Supplement. Gut Balance is a gut health supplement that
is designed to reduce bloating and gas as well as supporting digestion, regularity and immunity! Plus Mood Balance for supporting mood, relaxation and mental clarity! Use the code: GUTHEALTH30 to get 30% off first order.

@ascent_protein Nothing like a simple kickstart to help you train harder, recover stronger, and be fueled. Ascent products are a simple way to support strength & muscle
health as well as help you hit your protein goals while feeling fueled and energized! Clean Creatine has 5g of pure creatine monohydrate! The Iced Coffee + Protein has 20g of clean whey and 100mg of caffeine per serving ⚡

Check out these products and add them to your daily routine. Making the most of a simple, realistic and healthy lifestyle!

#BBNNM2026 #BITEINTOADVENTURE #FUELWITHMAIZLY #secondkind
This weekend caught me off guard with how I was go This weekend caught me off guard with how I was going to feel when I left. Headed to Houston not sure what to expect with the new NCA venue, but also the fact Chloe had sprained her foot earlier that week. As a mom, you second guess all the things… is it bad I let her do this? Am I wrong for telling her she needs to compete? Let me tell you, the moment she walked onto that mat.. I knew. It wasn’t about me, it was about her. This year has been a learning year. Learning a whole new team and learning a whole new position. We have had our emotional ups and downs, but this weekend sealed the deal.

Day 1 didn’t go our teams way- left us in last place. Tough when you know what they can do. Day 2 was their day… hit 0 with a 4 point increase. Moving from last place to 4th with only a 0.5 difference from being in that winner’s circle. When Chloe landed that last pose at the end of day 2, all I could do was cry. They came back and did their thing. Seeing Chloe out there, killing it and loving it is what it’s about. Don’t get me wrong, a cool jacket is something I know she wanted. But… she knows she went into beast mode this weekend, pushing through the issues with her foot, and did the darn thing. I couldn’t be more proud of her and this team! 

@cheerforcelouisiana came to NCA and truly showed out! Glad to say we are a part of this CF family 🩵🖤✨

#nca #allstarcheer #allstarcheerleading #allstarcheerleader #lacfglitter
Load More Follow on Instagram

Footer

  • Private Policy
  • Bare Strength LA

Copyright © 2026 · Theme by 17th Avenue